> ## Documentation Index
> Fetch the complete documentation index at: https://docs.getnativeflow.com/llms.txt
> Use this file to discover all available pages before exploring further.
# Integrations
> Connect a serverless provider, link Supabase, and point authentication at your own JWT endpoints.
## Overview
**CONNECT → Integrations** is Studio's catalog of external systems a project can be plugged into. You browse the catalog, pick a system, and fill in the connection details it asks for.
The catalog's own subtitle sets the framing: "Browse the catalog to plug NativeFlow into the systems your enterprise already runs."
Two integrations are connectable today, both under **Serverless Business Logic**:
* **AWS Lambda**
* **Azure Functions**
Connecting either one unlocks the **Cloud Functions** workspace, where you author, publish and invoke functions from inside Studio.
**Supabase is not an integration.** It has its own surface at **CONNECT → Database**, described further down this page.
The recording above is a real, unscripted session — it runs at automation speed with no narration. Both provider forms are opened and read field by field, but **Save** and **Verify** are never clicked — per the dialogs' own header text, nothing is added to the project until a connection actually verifies.
## Open the catalog
Expand **CONNECT** in the left sidebar and click the **plug** icon. The group is collapsed by default and its buttons do not exist in the page until you expand it.
On a project with nothing connected you get a three part empty state: a left column listing the catalog's ten categories, a "No integrations yet" message, and a centred card with an **Add integration** button.
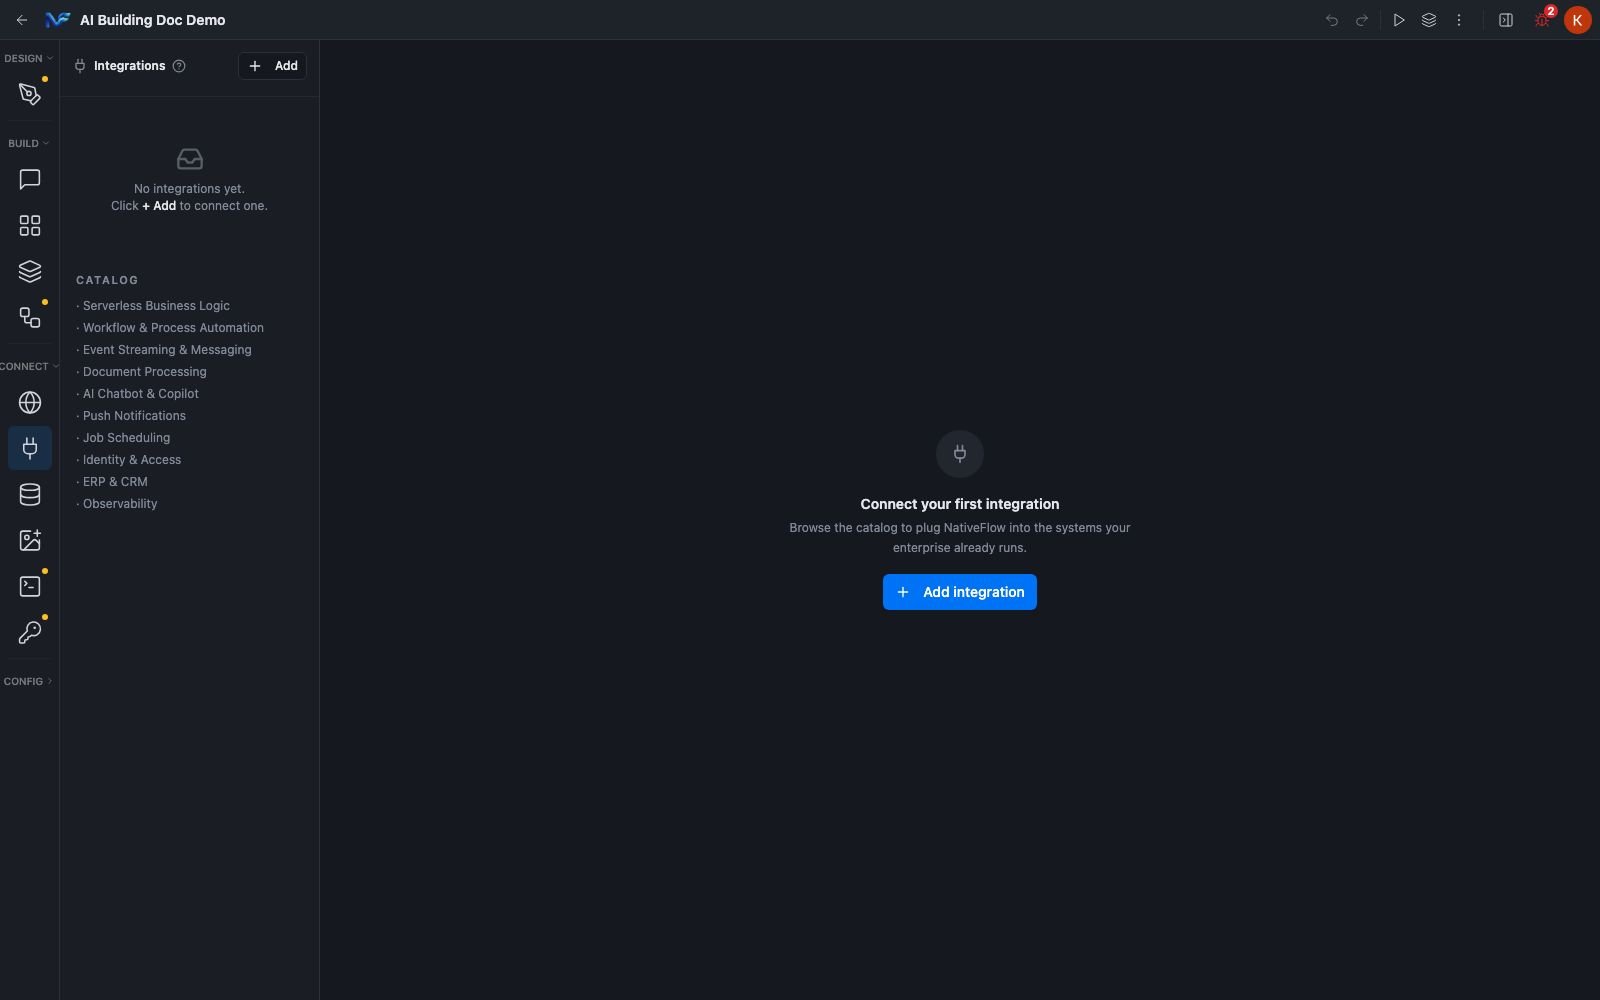 The ten categories are Serverless Business Logic, Workflow & Process Automation, Event Streaming & Messaging, Document Processing, AI Chatbot & Copilot, Push Notifications, Job Scheduling, Identity & Access, ERP & CRM and Observability.
Unlike **API Calls**, where clicking **+ Add** immediately creates and saves an empty `Untitled` record, Integrations creates nothing when you click Add. Both **+ Add** and the centred **Add integration** button just open the catalog dialog. Nothing exists until a connection verifies.
The ten categories are Serverless Business Logic, Workflow & Process Automation, Event Streaming & Messaging, Document Processing, AI Chatbot & Copilot, Push Notifications, Job Scheduling, Identity & Access, ERP & CRM and Observability.
Unlike **API Calls**, where clicking **+ Add** immediately creates and saves an empty `Untitled` record, Integrations creates nothing when you click Add. Both **+ Add** and the centred **Add integration** button just open the catalog dialog. Nothing exists until a connection verifies.
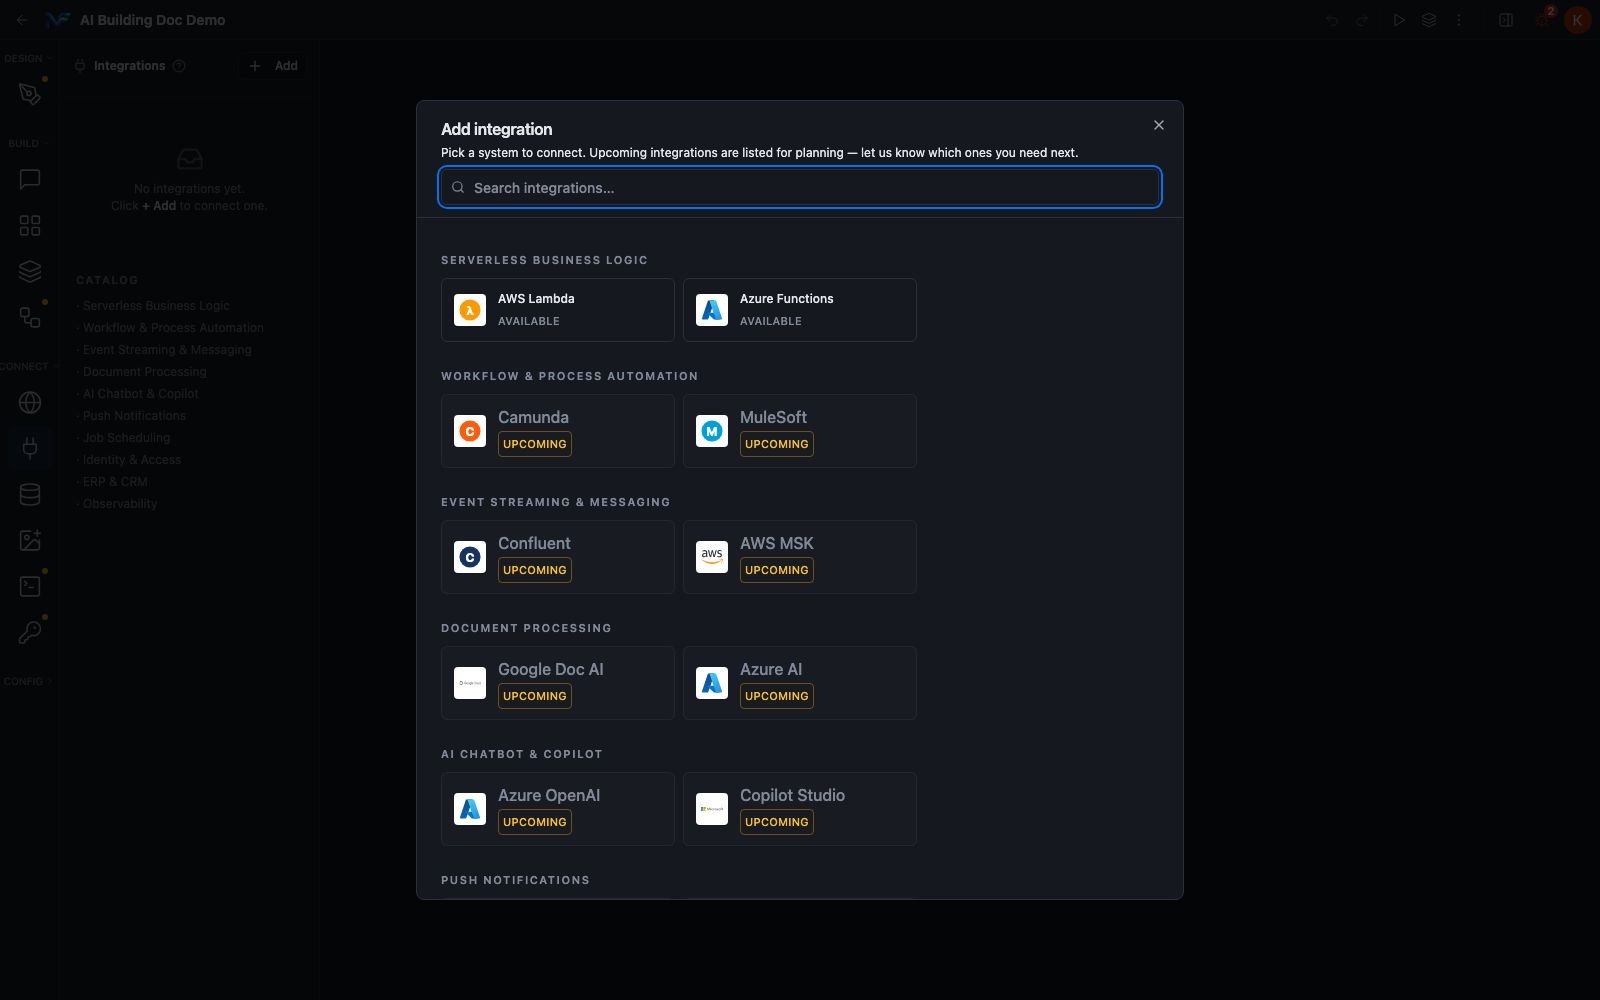 The dialog also has a **Search integrations** box, which filters the catalog as you type.
## Connecting AWS Lambda
Click the **AWS Lambda** tile. The dialog is headed as Step 1, connect provider, and states plainly that the integration is added to your project only after verification succeeds.
Its instruction: create an IAM role in your AWS account that trusts NativeFlow's deployer using the External ID shown in the form, then paste the role ARN.
The dialog also has a **Search integrations** box, which filters the catalog as you type.
## Connecting AWS Lambda
Click the **AWS Lambda** tile. The dialog is headed as Step 1, connect provider, and states plainly that the integration is added to your project only after verification succeeds.
Its instruction: create an IAM role in your AWS account that trusts NativeFlow's deployer using the External ID shown in the form, then paste the role ARN.
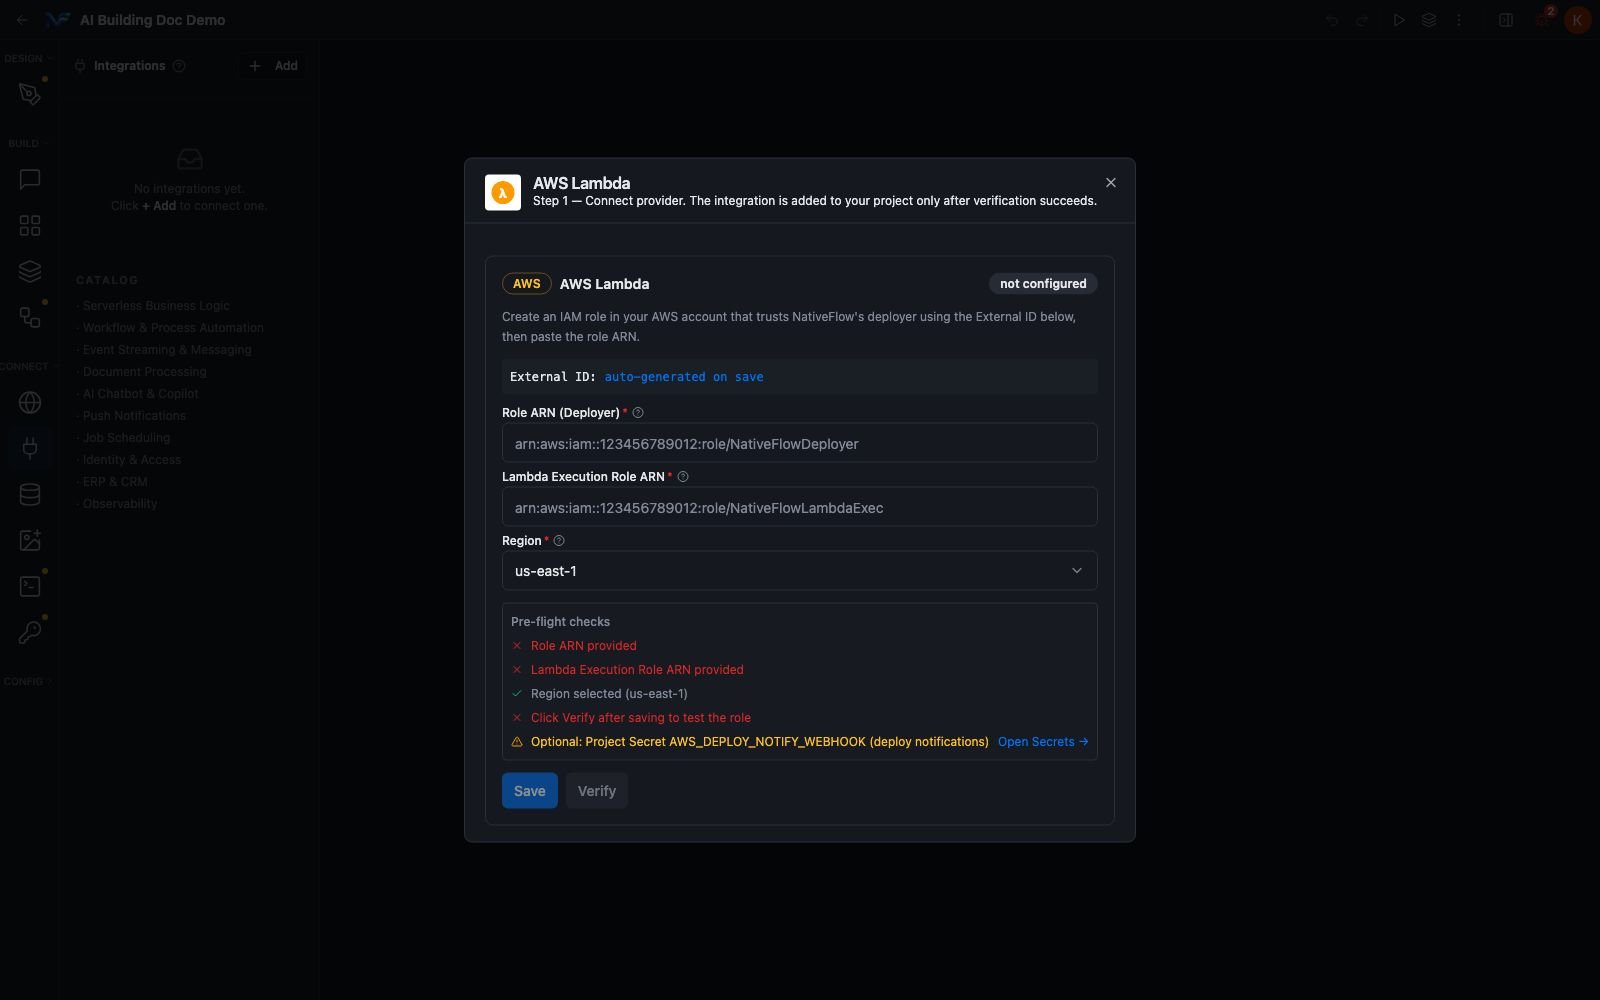 | Field | Control | What it is |
| - | - | - |
| **External ID** | Read only | Auto generated on save |
| **Role ARN (Deployer)** | Text, required | The role NativeFlow assumes to deploy Lambdas. Create it in IAM with a trust policy allowing NativeFlow's deployer principal and using the External ID as `sts:ExternalId`. |
| **Lambda Execution Role ARN** | Text, required | The role Lambda assumes at runtime. Attach `AWSLambdaBasicExecutionRole` at minimum, plus any policies your function needs. |
| **Region** | Dropdown, required, defaults to `us-east-1` | Eleven regions, no free text option |
The eleven regions are `us-east-1`, `us-east-2`, `us-west-1`, `us-west-2`, `eu-west-1`, `eu-west-2`, `eu-central-1`, `ap-south-1`, `ap-southeast-1`, `ap-southeast-2` and `ap-northeast-1`.
Below the fields is a live **Pre-flight checks** list that turns red or green as you fill the form, and a warning row about an optional Project Secret for deploy notifications. **Verify** stays greyed out until you **Save**.
## Connecting Azure Functions
Same dialog shape, different fields. Its instruction: create a Service Principal with Contributor on your Function App, then store the client secret in Project Secrets as `AZURE_CLIENT_SECRET` with server only visibility.
| Field | Control | What it is |
| - | - | - |
| **External ID** | Read only | Auto generated on save |
| **Role ARN (Deployer)** | Text, required | The role NativeFlow assumes to deploy Lambdas. Create it in IAM with a trust policy allowing NativeFlow's deployer principal and using the External ID as `sts:ExternalId`. |
| **Lambda Execution Role ARN** | Text, required | The role Lambda assumes at runtime. Attach `AWSLambdaBasicExecutionRole` at minimum, plus any policies your function needs. |
| **Region** | Dropdown, required, defaults to `us-east-1` | Eleven regions, no free text option |
The eleven regions are `us-east-1`, `us-east-2`, `us-west-1`, `us-west-2`, `eu-west-1`, `eu-west-2`, `eu-central-1`, `ap-south-1`, `ap-southeast-1`, `ap-southeast-2` and `ap-northeast-1`.
Below the fields is a live **Pre-flight checks** list that turns red or green as you fill the form, and a warning row about an optional Project Secret for deploy notifications. **Verify** stays greyed out until you **Save**.
## Connecting Azure Functions
Same dialog shape, different fields. Its instruction: create a Service Principal with Contributor on your Function App, then store the client secret in Project Secrets as `AZURE_CLIENT_SECRET` with server only visibility.
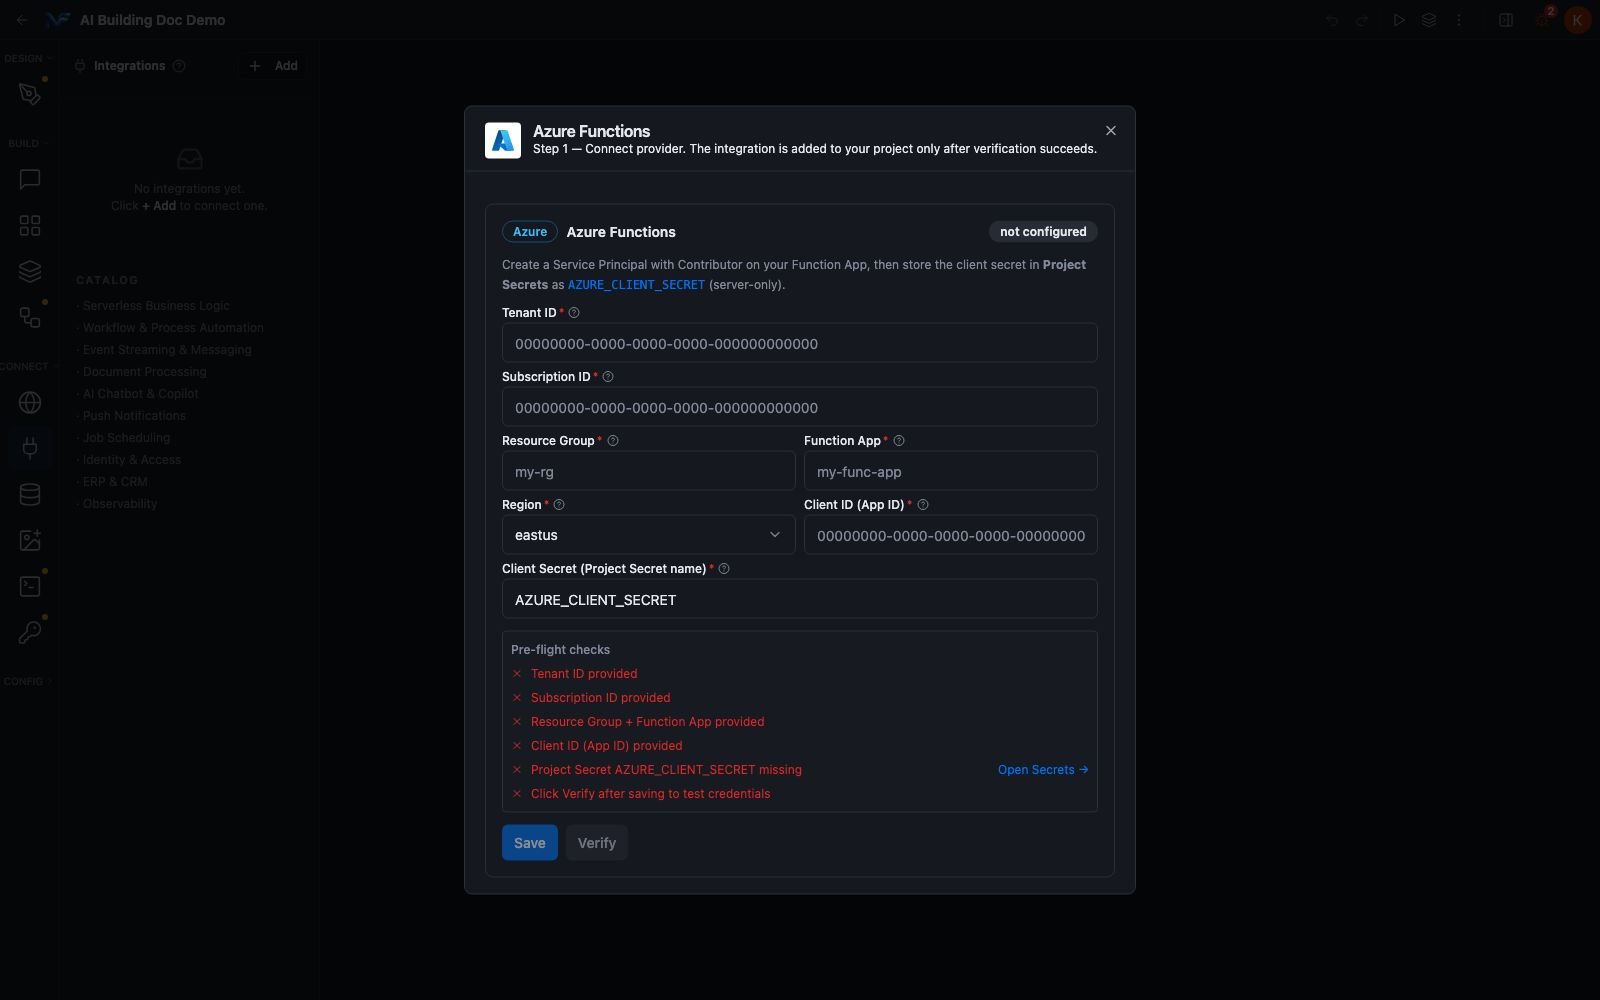 | Field | What it is |
| - | - |
| **Tenant ID** | The Azure AD tenant where your Service Principal lives |
| **Subscription ID** | The subscription that owns the Function App |
| **Resource Group** | The resource group containing the Function App |
| **Function App** | The name of the Function App that will host your functions. Create it in the Azure portal first. |
| **Region** | Ten Azure regions, defaulting to `eastus`. Must match the region you picked when creating the Function App. |
| **Client ID (App ID)** | The application ID of your Service Principal |
| **Client Secret (Project Secret name)** | The *name* of a Project Secret, pre-filled with `AZURE_CLIENT_SECRET` |
Two points answer the questions people usually arrive with:
**Studio offers the Azure AD service principal path.** The form takes a tenant, subscription, resource group, function app, region and client ID, and it identifies your app through that service principal.
**You never paste the client secret into this form.** The last field takes the name of a Project Secret, created under **CONNECT → Secrets** with server visibility. The secret's value never enters the integration record and is never bundled into the app.
## Where the two providers lead: Cloud Functions
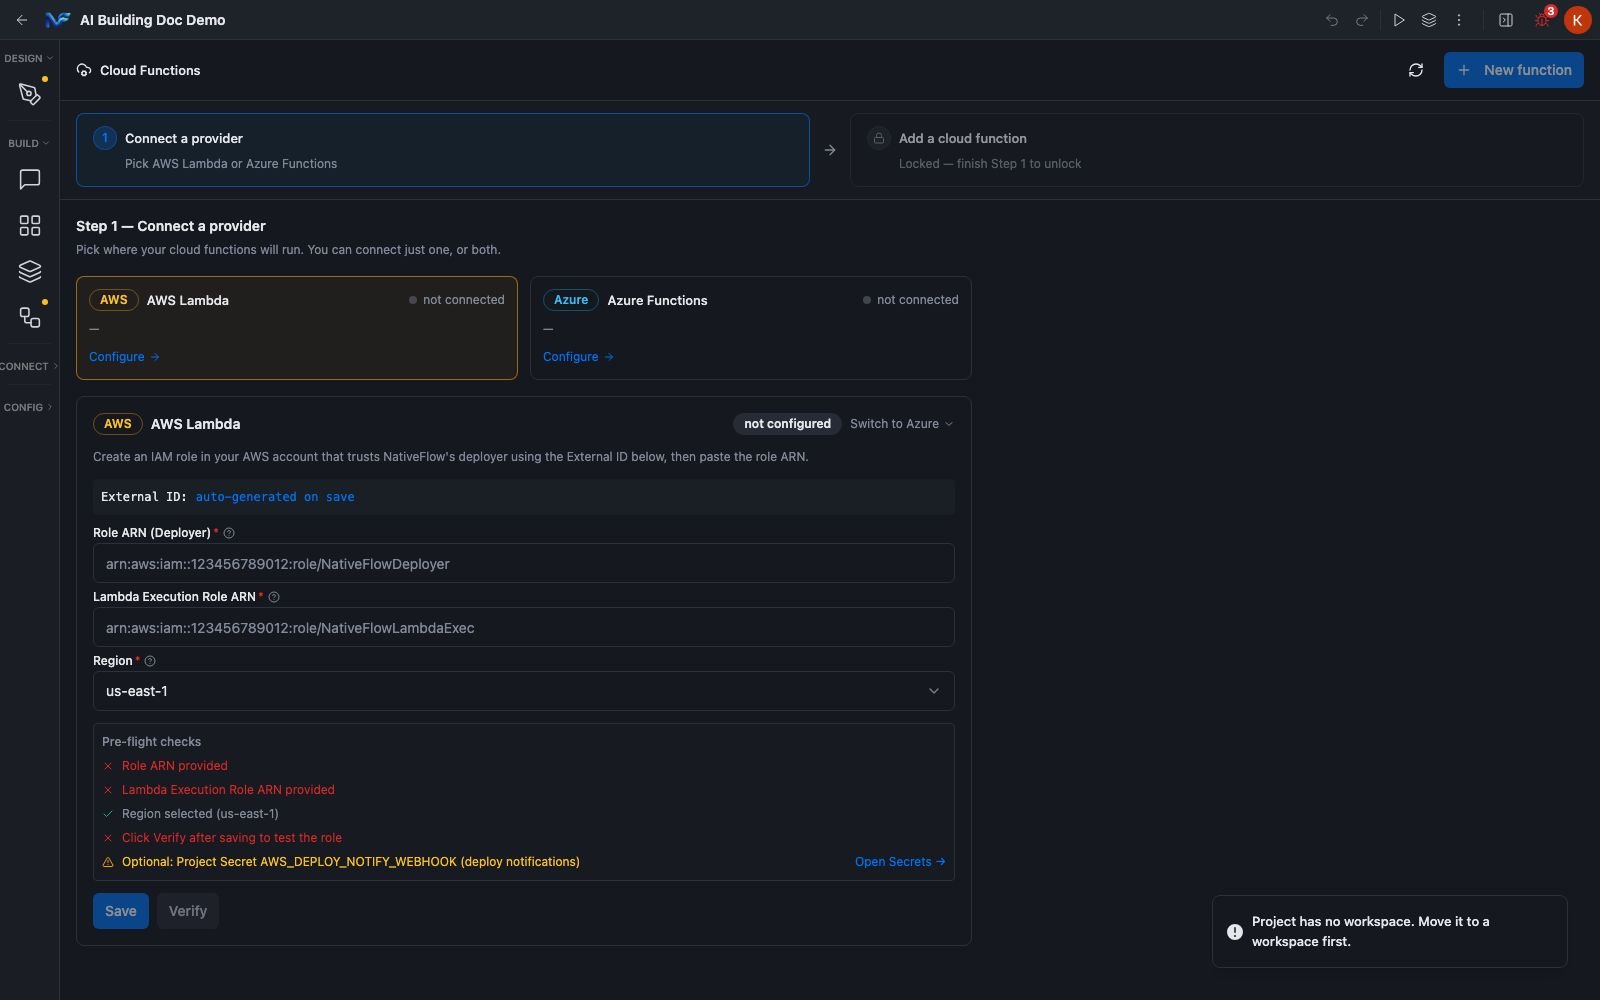
**Connecting AWS Lambda or Azure Functions does not put an endpoint in the API Calls pane.** It unlocks a separate **Cloud Functions** workspace where you author, publish and invoke functions from inside Studio.
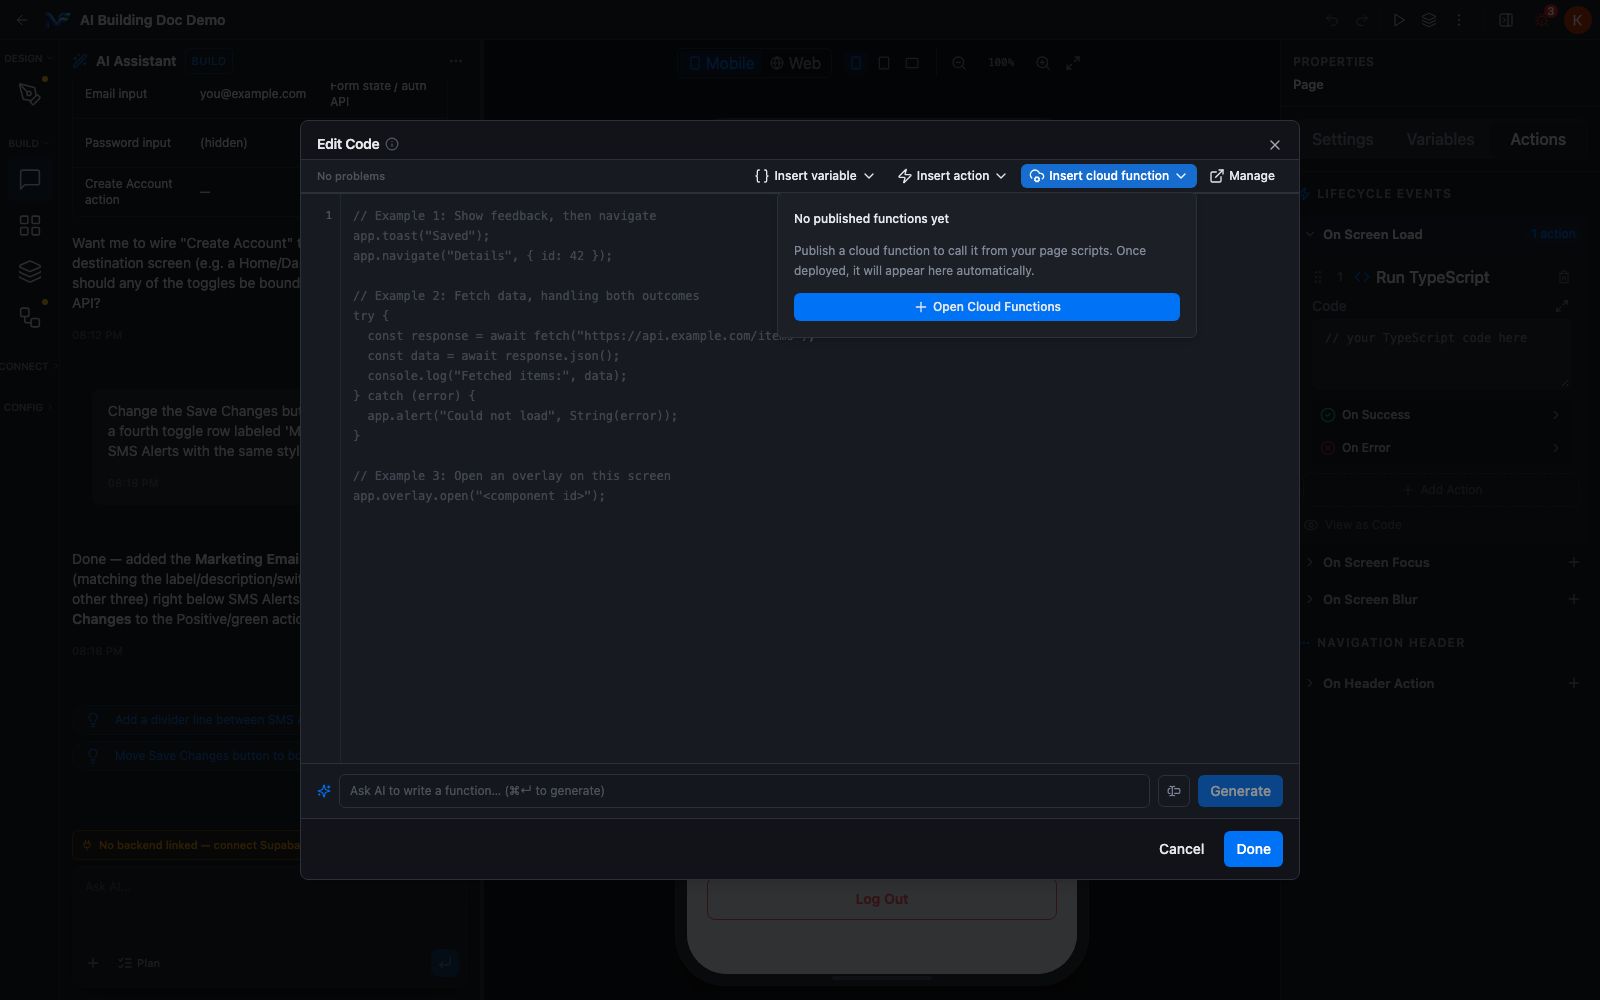
You reach Cloud Functions through the code editor of a **Run TypeScript** action. Open any action's **Code** field in the expanded editor, and its toolbar carries **Insert cloud function** and **Manage**.
| Field | What it is |
| - | - |
| **Tenant ID** | The Azure AD tenant where your Service Principal lives |
| **Subscription ID** | The subscription that owns the Function App |
| **Resource Group** | The resource group containing the Function App |
| **Function App** | The name of the Function App that will host your functions. Create it in the Azure portal first. |
| **Region** | Ten Azure regions, defaulting to `eastus`. Must match the region you picked when creating the Function App. |
| **Client ID (App ID)** | The application ID of your Service Principal |
| **Client Secret (Project Secret name)** | The *name* of a Project Secret, pre-filled with `AZURE_CLIENT_SECRET` |
Two points answer the questions people usually arrive with:
**Studio offers the Azure AD service principal path.** The form takes a tenant, subscription, resource group, function app, region and client ID, and it identifies your app through that service principal.
**You never paste the client secret into this form.** The last field takes the name of a Project Secret, created under **CONNECT → Secrets** with server visibility. The secret's value never enters the integration record and is never bundled into the app.
## Where the two providers lead: Cloud Functions
**Connecting AWS Lambda or Azure Functions does not put an endpoint in the API Calls pane.** It unlocks a separate **Cloud Functions** workspace where you author, publish and invoke functions from inside Studio.
You reach Cloud Functions through the code editor of a **Run TypeScript** action. Open any action's **Code** field in the expanded editor, and its toolbar carries **Insert cloud function** and **Manage**.
 Opening the panel shows a two card progress strip. Step 1 is connecting a provider. Step 2, adding a cloud function, unlocks once Step 1 is finished. Below that sit AWS Lambda and Azure Functions cards showing their connection state, and the same provider forms as above with a control for switching between them.
 You call a published function from a page script, not from an API Call. Studio's own guidance in the inserter's empty state is to publish a cloud function and then call it from your page scripts. The shape the inserter produces is:
```ts theme={null}
// Call cloud function:
const { data, error } = await app.fn.({
"test": true
});
if (error) { Alert.alert('Error', error.message); return; }
console.log(' →', data);
```
Errors come back as a result object rather than as an exception, so you check `error` rather than catching.
## Supabase: linking and schema work
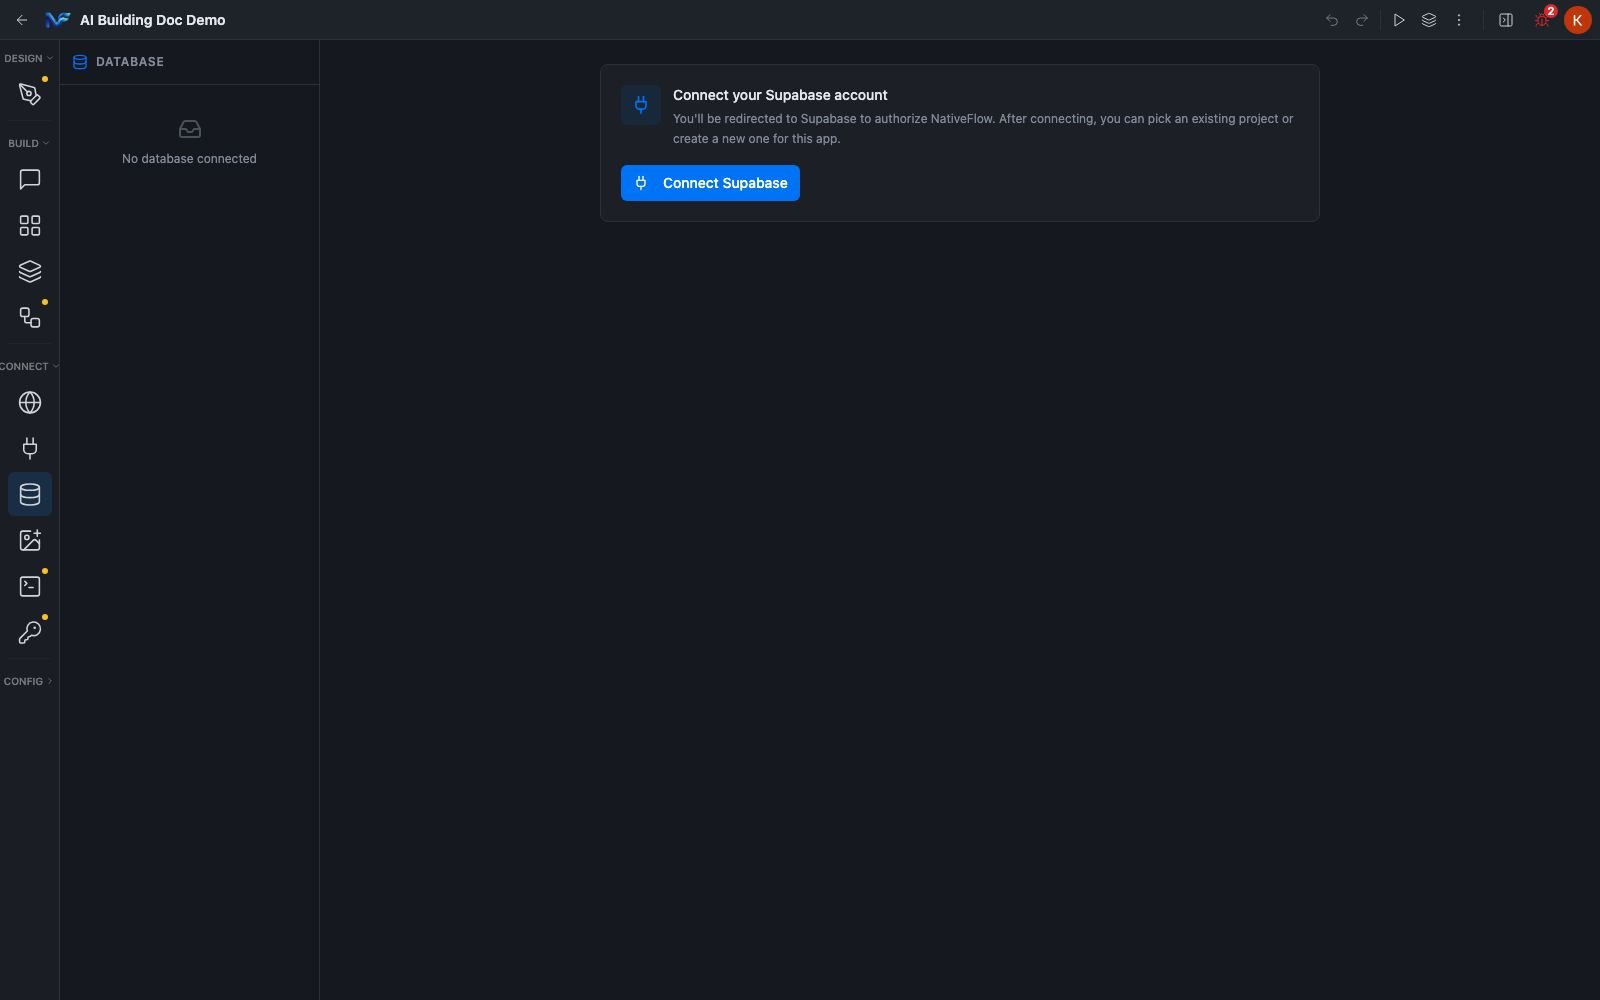
Connecting Supabase happens at **CONNECT → Database**, and it is a credential free authorization handoff: one button, then you authorize NativeFlow on Supabase's own site and pick or create a project. There is no project URL, anon key or service role field anywhere in the unlinked state.
You call a published function from a page script, not from an API Call. Studio's own guidance in the inserter's empty state is to publish a cloud function and then call it from your page scripts. The shape the inserter produces is:
```ts theme={null}
// Call cloud function:
const { data, error } = await app.fn.({
"test": true
});
if (error) { Alert.alert('Error', error.message); return; }
console.log(' →', data);
```
Errors come back as a result object rather than as an exception, so you check `error` rather than catching.
## Supabase: linking and schema work
Connecting Supabase happens at **CONNECT → Database**, and it is a credential free authorization handoff: one button, then you authorize NativeFlow on Supabase's own site and pick or create a project. There is no project URL, anon key or service role field anywhere in the unlinked state.
 **What creates tables and policies is the AI Assistant.** Studio's assistant carries a `backend` tool group of nineteen tools covering exactly this ground: listing tables, creating a table, altering and dropping tables, enabling RLS, creating and listing policies, creating indexes, an arbitrary SQL escape hatch, Supabase edge function management, and two tools that turn a table or an edge function into an entry in the **API Calls** pane.
A few of those tool descriptions are worth reading as design decisions:
| Tool | What it does |
| - | - |
| `get_backend_status` | Checks whether the project is linked at all. It is meant to be called before any other backend tool. |
| `create_table` | Always adds an `id uuid` primary key, `created_at` and `updated_at` with a trigger, grants to `authenticated` and `service_role`, enables RLS, and adds an owner only policy if a `user_id` column exists. |
| `drop_table` | Destructive, and requires explicit confirmation plus an `allow_destructive` flag. |
| `create_policy` | Creates one RLS policy, defaulting the role to `authenticated`. |
| `exec_sql` | The escape hatch. It refuses DROP, TRUNCATE and DELETE unless `allow_destructive` is true. |
| `register_table_api` then `bind_api_to_component` | The explicit bridge from a table to the UI. |
So the practical path is: link Supabase, then ask the AI Assistant in plain English for the table, the column change or the policy. The three stage route from data to screen is create the table, register it as an API, then bind that API to a component, which is the same path a person takes by hand through API Calls.
## Identity backends
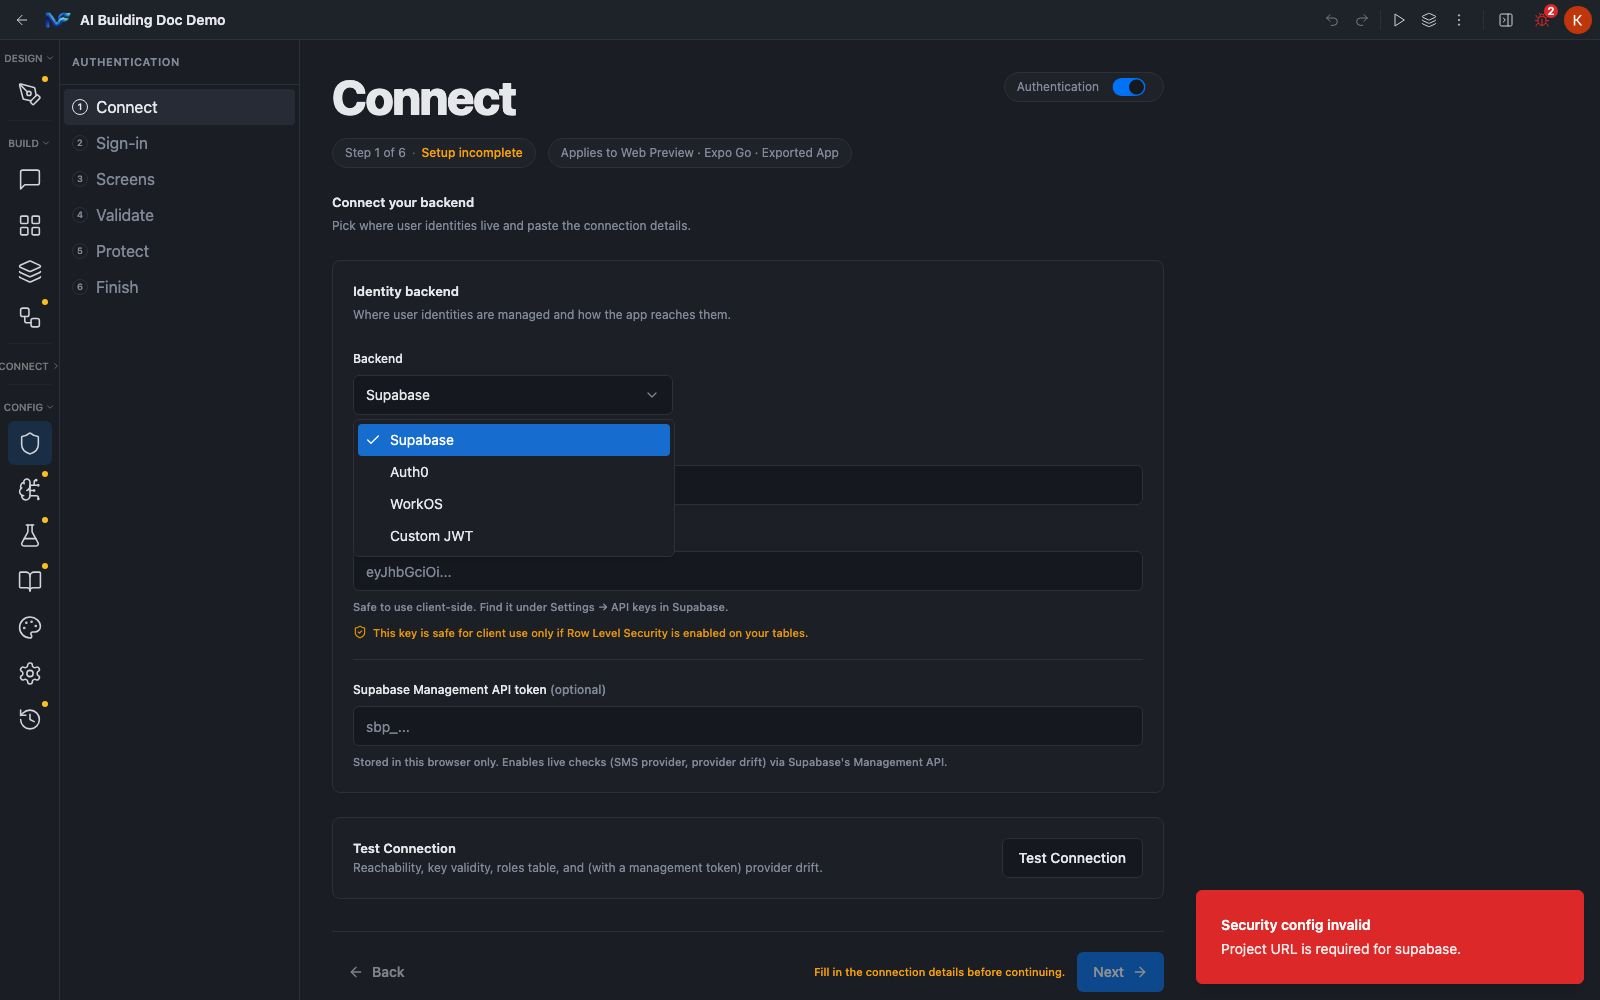
Open **CONFIG → Security**, turn authentication on, and open the **Backend** dropdown. It offers **Supabase**, **Auth0**, **WorkOS** and **Custom JWT**.
**What creates tables and policies is the AI Assistant.** Studio's assistant carries a `backend` tool group of nineteen tools covering exactly this ground: listing tables, creating a table, altering and dropping tables, enabling RLS, creating and listing policies, creating indexes, an arbitrary SQL escape hatch, Supabase edge function management, and two tools that turn a table or an edge function into an entry in the **API Calls** pane.
A few of those tool descriptions are worth reading as design decisions:
| Tool | What it does |
| - | - |
| `get_backend_status` | Checks whether the project is linked at all. It is meant to be called before any other backend tool. |
| `create_table` | Always adds an `id uuid` primary key, `created_at` and `updated_at` with a trigger, grants to `authenticated` and `service_role`, enables RLS, and adds an owner only policy if a `user_id` column exists. |
| `drop_table` | Destructive, and requires explicit confirmation plus an `allow_destructive` flag. |
| `create_policy` | Creates one RLS policy, defaulting the role to `authenticated`. |
| `exec_sql` | The escape hatch. It refuses DROP, TRUNCATE and DELETE unless `allow_destructive` is true. |
| `register_table_api` then `bind_api_to_component` | The explicit bridge from a table to the UI. |
So the practical path is: link Supabase, then ask the AI Assistant in plain English for the table, the column change or the policy. The three stage route from data to screen is create the table, register it as an API, then bind that API to a component, which is the same path a person takes by hand through API Calls.
## Identity backends
Open **CONFIG → Security**, turn authentication on, and open the **Backend** dropdown. It offers **Supabase**, **Auth0**, **WorkOS** and **Custom JWT**.
 **Auth0** and **WorkOS** are first class backends with their own field sets, and either is a less do it yourself path than Custom JWT if you are willing to move identities.
The user visible name for the saved security object is a red toast reading "Security config invalid", followed by what is missing, such as "Project URL is required for supabase." The same toast is reworded per backend.
### Custom JWT
Select **Custom JWT** in the Backend dropdown and Studio asks for endpoints rather than an SDK.
**Auth0** and **WorkOS** are first class backends with their own field sets, and either is a less do it yourself path than Custom JWT if you are willing to move identities.
The user visible name for the saved security object is a red toast reading "Security config invalid", followed by what is missing, such as "Project URL is required for supabase." The same toast is reworded per backend.
### Custom JWT
Select **Custom JWT** in the Backend dropdown and Studio asks for endpoints rather than an SDK.
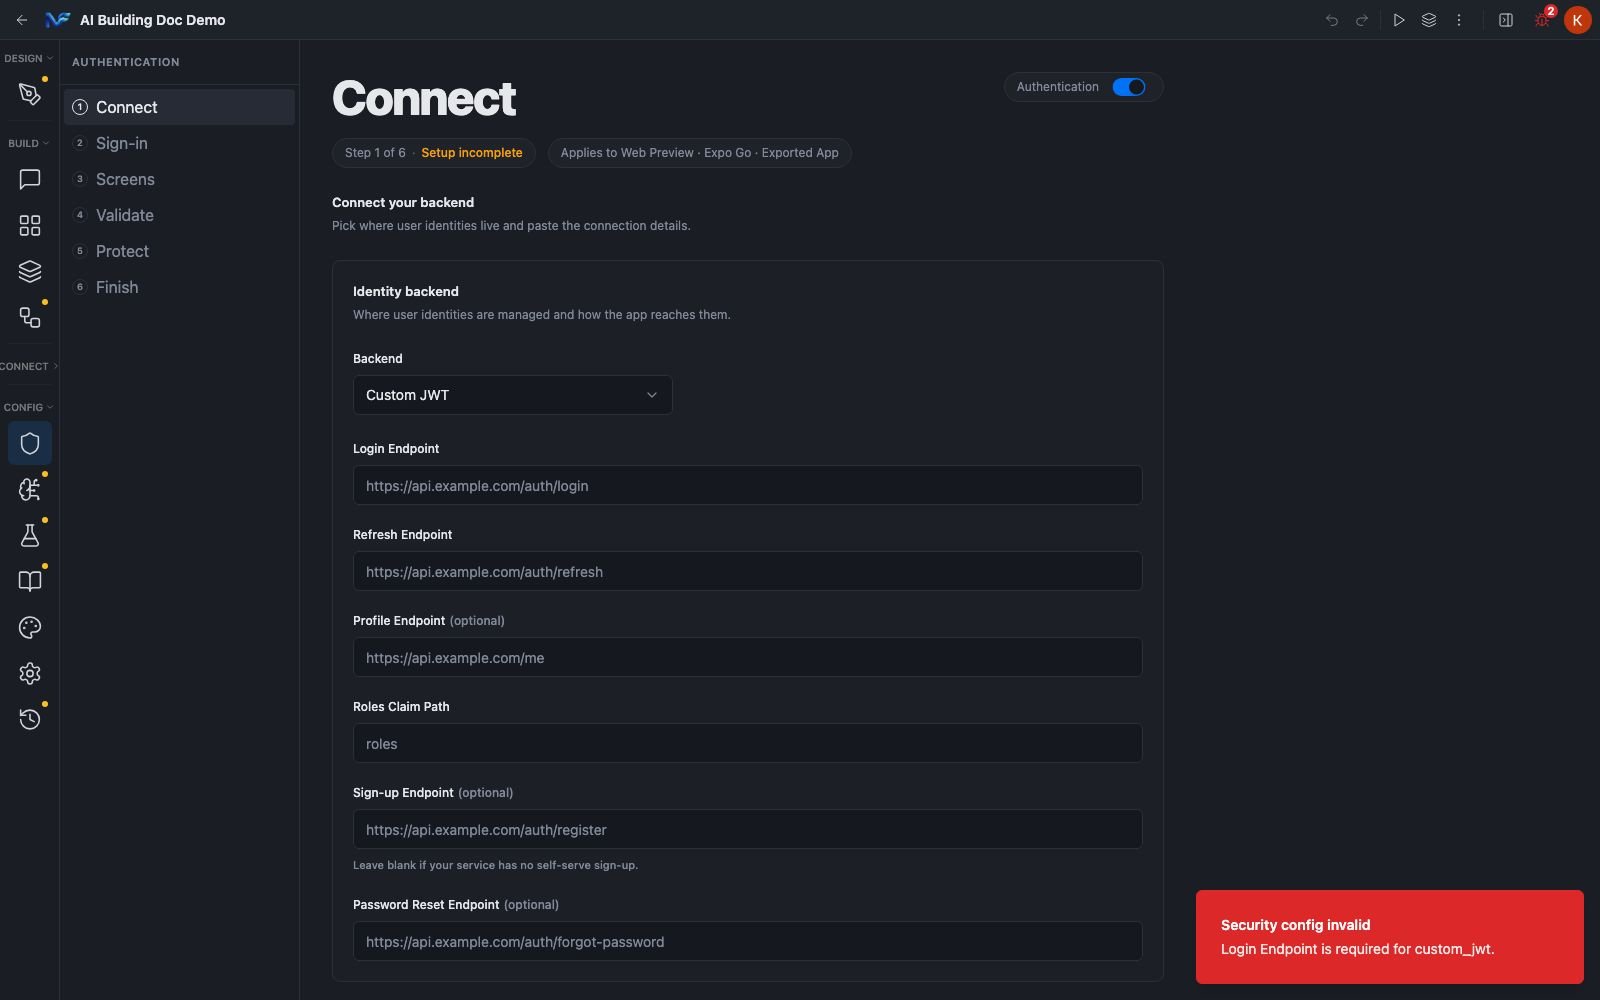 | Field | Required |
| - | - |
| **Login Endpoint** | Yes |
| **Refresh Endpoint** | Yes |
| **Profile Endpoint** | Optional |
| **Roles Claim Path** | Yes |
| **Sign-up Endpoint** | Optional, leave blank if your service has no self serve sign up |
| **Password Reset Endpoint** | Optional |
**Roles Claim Path** is where role and claims mapping actually lives. You tell Studio which claim in your JWT carries the user's roles, and those roles are what the roles and permissions panel then works with.
Custom JWT expects **your own HTTP endpoints** that return tokens. Any identity service can sit behind those endpoints, as long as it is your endpoints Studio calls.
The app's identity and packaging, and where the Supabase link sits relative to it.
Check what a connected app actually does, beside the canvas.
## Summary
AWS Lambda and Azure Functions are the two integrations you connect from the catalog, and connecting either unlocks the Cloud Functions workspace, reached from the toolbar of a Run TypeScript action's code editor. Supabase is linked separately under **CONNECT → Database** through an authorization handoff, and schema work goes through the AI Assistant's backend tools. For authentication, the Backend dropdown offers Supabase, Auth0, WorkOS and Custom JWT, with Custom JWT pointing Studio at your own endpoints and a Roles Claim Path.
| Field | Required |
| - | - |
| **Login Endpoint** | Yes |
| **Refresh Endpoint** | Yes |
| **Profile Endpoint** | Optional |
| **Roles Claim Path** | Yes |
| **Sign-up Endpoint** | Optional, leave blank if your service has no self serve sign up |
| **Password Reset Endpoint** | Optional |
**Roles Claim Path** is where role and claims mapping actually lives. You tell Studio which claim in your JWT carries the user's roles, and those roles are what the roles and permissions panel then works with.
Custom JWT expects **your own HTTP endpoints** that return tokens. Any identity service can sit behind those endpoints, as long as it is your endpoints Studio calls.
The app's identity and packaging, and where the Supabase link sits relative to it.
Check what a connected app actually does, beside the canvas.
## Summary
AWS Lambda and Azure Functions are the two integrations you connect from the catalog, and connecting either unlocks the Cloud Functions workspace, reached from the toolbar of a Run TypeScript action's code editor. Supabase is linked separately under **CONNECT → Database** through an authorization handoff, and schema work goes through the AI Assistant's backend tools. For authentication, the Backend dropdown offers Supabase, Auth0, WorkOS and Custom JWT, with Custom JWT pointing Studio at your own endpoints and a Roles Claim Path.