> ## Documentation Index
> Fetch the complete documentation index at: https://docs.getnativeflow.com/llms.txt
> Use this file to discover all available pages before exploring further.
# Build Screens with AI
> Prompt the AI Assistant for one screen or a whole flow, then refine the result without losing what works.
## Overview
The AI Assistant turns a plain English prompt into real, editable screens. This guide picks up after your first generated screen and covers the three things you do next: wording a prompt so you get the structure you actually want, asking for a multi screen flow in one go, and refining an existing screen with a follow up prompt.
By the end you will have generated a three screen onboarding flow with real navigation between the screens, checked that wiring yourself, and made a follow up edit to a screen that already had content on it.
**Prerequisites**
* A NativeFlow Studio account, signed in, with a project open.
* One screen already generated, so you have something to iterate on. Creating a project and prompting the very first screen is covered in the Quickstart.
Everything happens in the **Ask AI...** box in the AI Assistant panel. There is nothing new to open.
A brand new project's page content, including anything the AI has just built, does not reliably survive a page reload. Keep working in the same browser tab and do not reload a freshly created project if you need the generated screens to stay.
The recording above is a real, unscripted session — it runs at automation speed with no narration, and every prompt in it is the exact text shown below.
## Prompt for one screen
The AI Assistant acts on a one line prompt. It does not wait for detail. It fills in whatever you leave out.
```text theme={null}
Build a settings screen
```
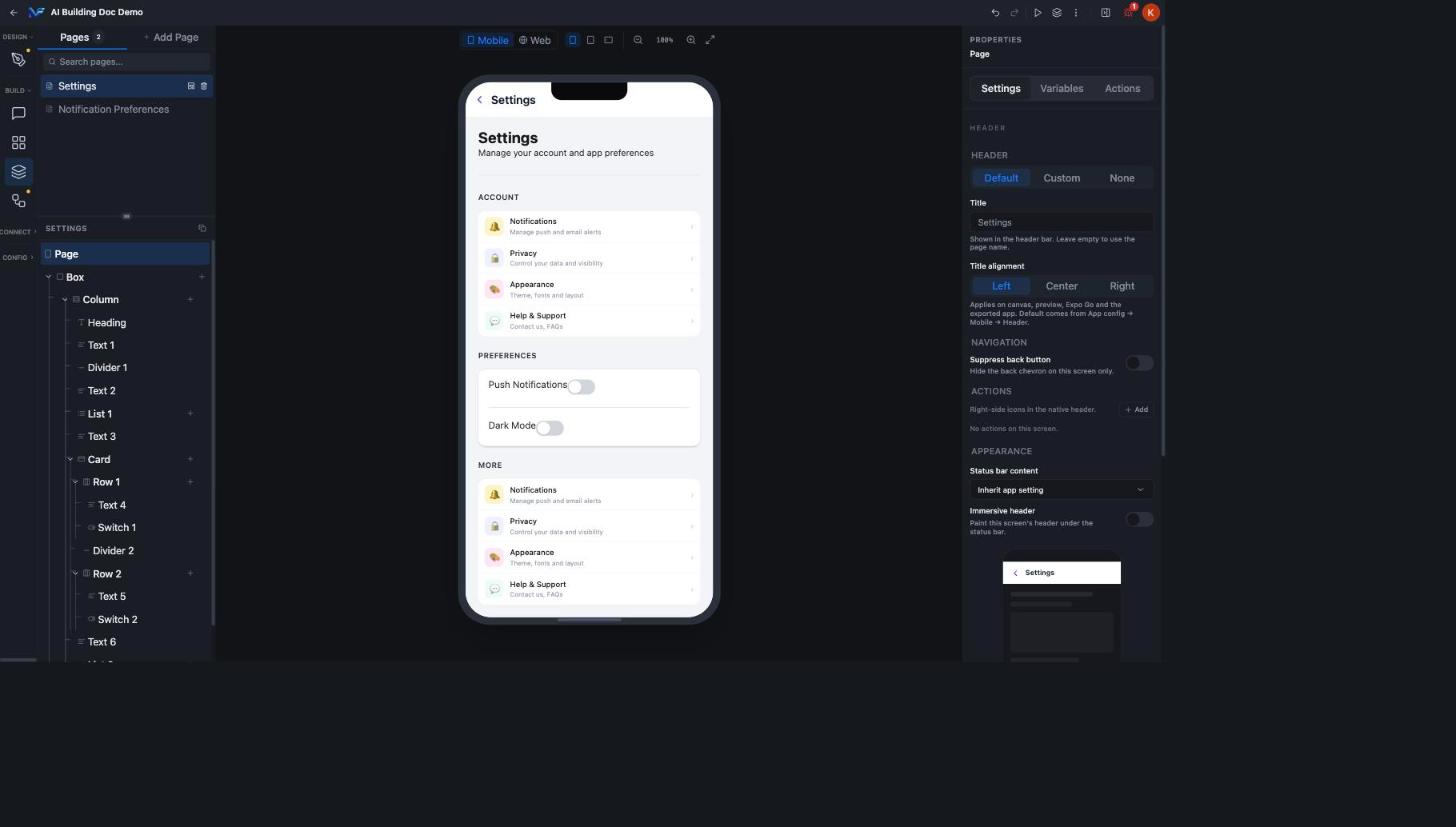
That prompt, with no component names, no layout and no content, produced a complete screen on its own initiative: a heading and subtitle, an ACCOUNT section built from the built in **List** component template with three rows of icon, label, description and chevron, a PREFERENCES section with two `Switch` rows for Push Notifications and Dark Mode, a MORE section with a second List of two rows, and an outlined red **Log Out** button. None of that was asked for by name. The AI chose the structure and then explained its choices in the chat.
 Use this when you want a plausible screen quickly and you are happy to edit it afterwards.
Name the component types, the exact labels, the exact count and the layout. The result matches the spec instead of improvising one.
```text theme={null}
Build a new page called 'Notification Preferences' with a Column containing:
a Heading 'Notification Preferences', three Switch rows labeled 'Email Alerts',
'Push Notifications', and 'SMS Alerts' each with a one-line Text description
underneath, and a solid Button labeled 'Save Changes' pinned to the bottom of
the screen.
```
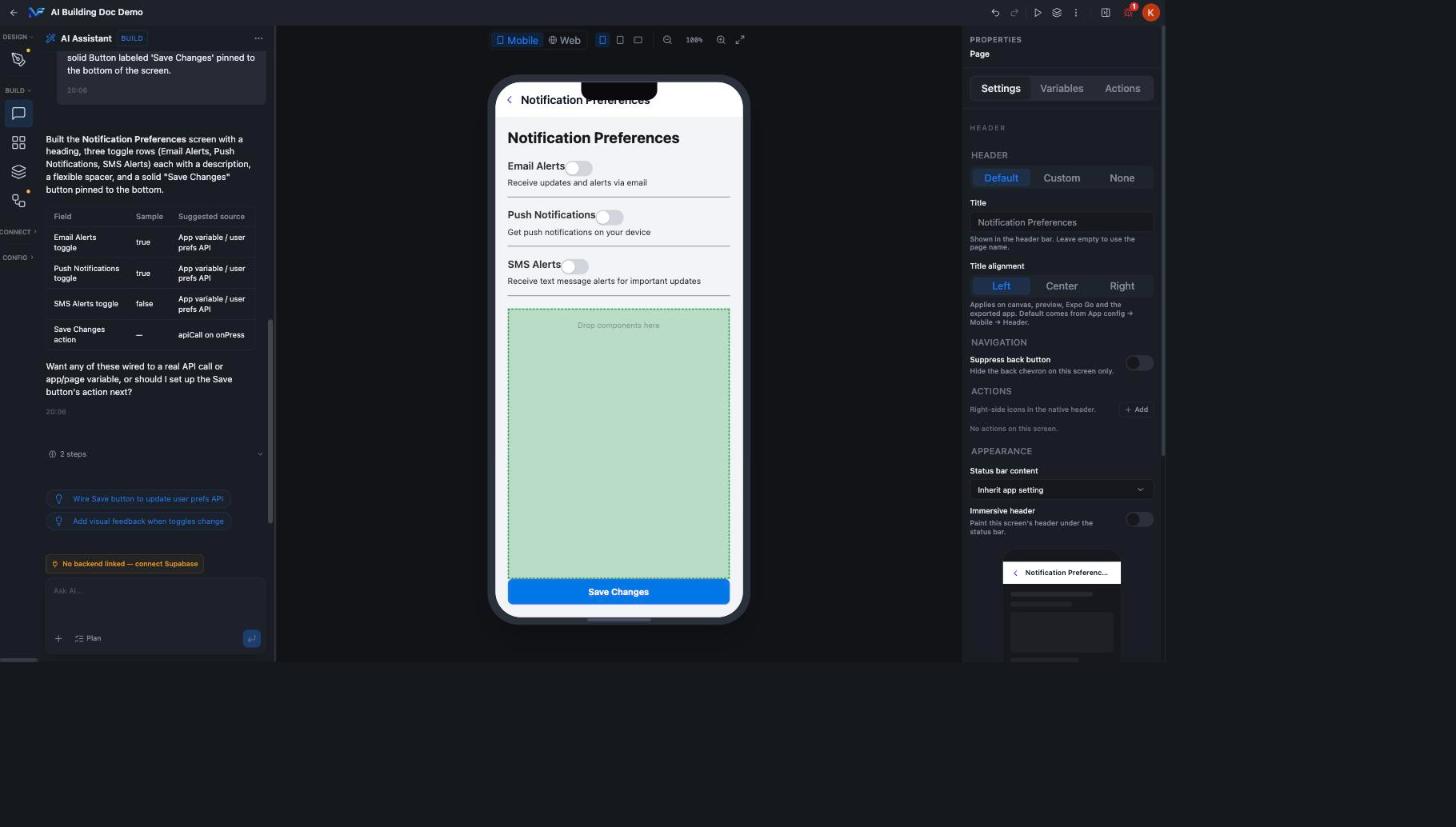
The result had exactly three `Switch` rows with exactly those three labels, a one line description under each, and a **Save Changes** button pinned to the bottom using a flexible spacer. No extra sections and no invented content. The component tree showed three `Column > Row(Text, Switch), Text` groups and nothing more.
Use this when you want a plausible screen quickly and you are happy to edit it afterwards.
Name the component types, the exact labels, the exact count and the layout. The result matches the spec instead of improvising one.
```text theme={null}
Build a new page called 'Notification Preferences' with a Column containing:
a Heading 'Notification Preferences', three Switch rows labeled 'Email Alerts',
'Push Notifications', and 'SMS Alerts' each with a one-line Text description
underneath, and a solid Button labeled 'Save Changes' pinned to the bottom of
the screen.
```
The result had exactly three `Switch` rows with exactly those three labels, a one line description under each, and a **Save Changes** button pinned to the bottom using a flexible spacer. No extra sections and no invented content. The component tree showed three `Column > Row(Text, Switch), Text` groups and nothing more.
 Say **Build a new page called '...'** when you want a separate page. That wording is what made the second prompt above land as a new page rather than an edit to the open one. To edit instead, reference "this screen" or just describe the change.
## Generate a multi screen flow
One prompt can create several screens and wire real navigation between them.
```text theme={null}
Build a 3-screen onboarding flow: a Welcome screen with a headline and a
'Get Started' button, a Permissions screen with a heading and three toggle
rows for Camera, Notifications, and Location access plus a 'Continue' button,
and a Sign Up screen with Email and Password fields and a 'Create Account'
button. Wire navigation so Get Started goes to Permissions, and Continue goes
to Sign Up.
```
While it runs, the AI Assistant's step log shows the build happening: `Creating screen 'Welcome'`, `Creating screen 'Permissions'`, `Creating screen 'Sign Up'`, then one `Building component tree` step per screen, several `Setting component events` steps that wire the button actions, and `Switching to screen ` steps in between.
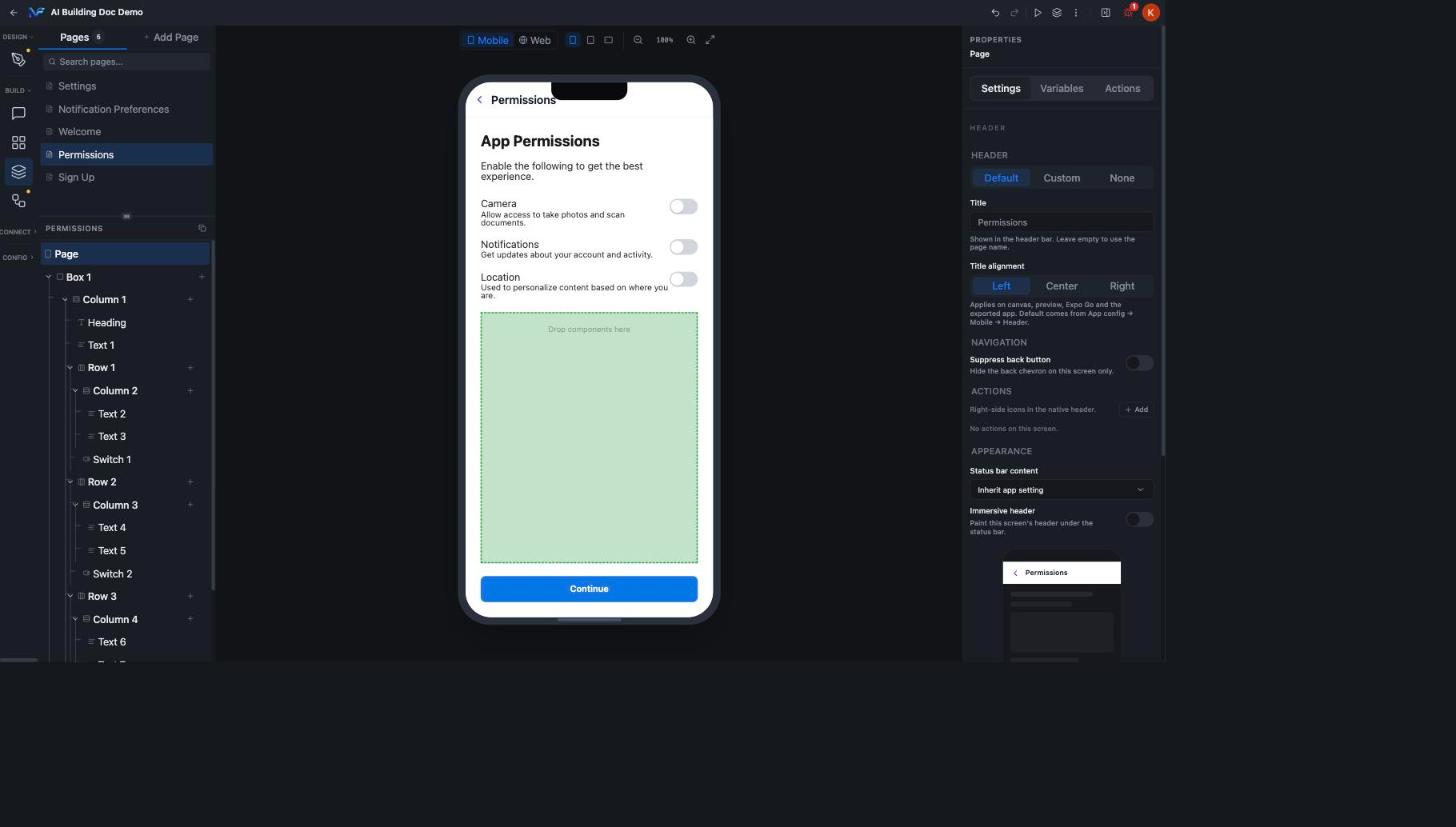
Open the Pages panel. The three screens are genuinely new, separate pages in the project, not sections of one screen. In the verified run the project went from 2 pages to 5.
Say **Build a new page called '...'** when you want a separate page. That wording is what made the second prompt above land as a new page rather than an edit to the open one. To edit instead, reference "this screen" or just describe the change.
## Generate a multi screen flow
One prompt can create several screens and wire real navigation between them.
```text theme={null}
Build a 3-screen onboarding flow: a Welcome screen with a headline and a
'Get Started' button, a Permissions screen with a heading and three toggle
rows for Camera, Notifications, and Location access plus a 'Continue' button,
and a Sign Up screen with Email and Password fields and a 'Create Account'
button. Wire navigation so Get Started goes to Permissions, and Continue goes
to Sign Up.
```
While it runs, the AI Assistant's step log shows the build happening: `Creating screen 'Welcome'`, `Creating screen 'Permissions'`, `Creating screen 'Sign Up'`, then one `Building component tree` step per screen, several `Setting component events` steps that wire the button actions, and `Switching to screen ` steps in between.
Open the Pages panel. The three screens are genuinely new, separate pages in the project, not sections of one screen. In the verified run the project went from 2 pages to 5.
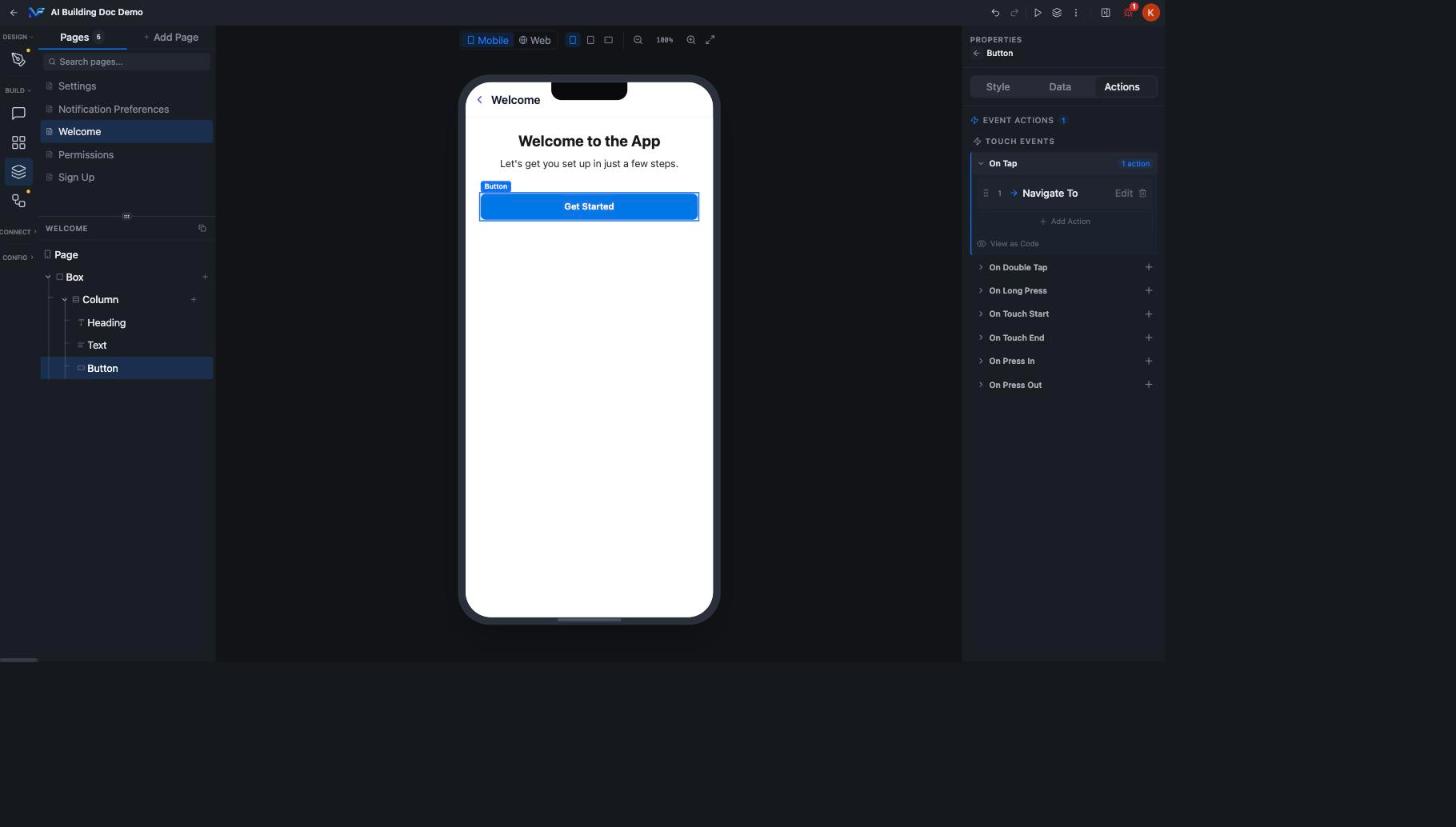
 Select a button, open **Properties > Actions**, and look at the `On Tap` row.
* Welcome's **Get Started** button showed **1 action**, a **Navigate To**.
* Permissions' **Continue** button showed the same, **1 action**, a **Navigate To**.
* Sign Up's **Create Account** button showed no action at all. The touch event rows were empty, with only a `+` to add one.
Select a button, open **Properties > Actions**, and look at the `On Tap` row.
* Welcome's **Get Started** button showed **1 action**, a **Navigate To**.
* Permissions' **Continue** button showed the same, **1 action**, a **Navigate To**.
* Sign Up's **Create Account** button showed no action at all. The touch event rows were empty, with only a `+` to add one.
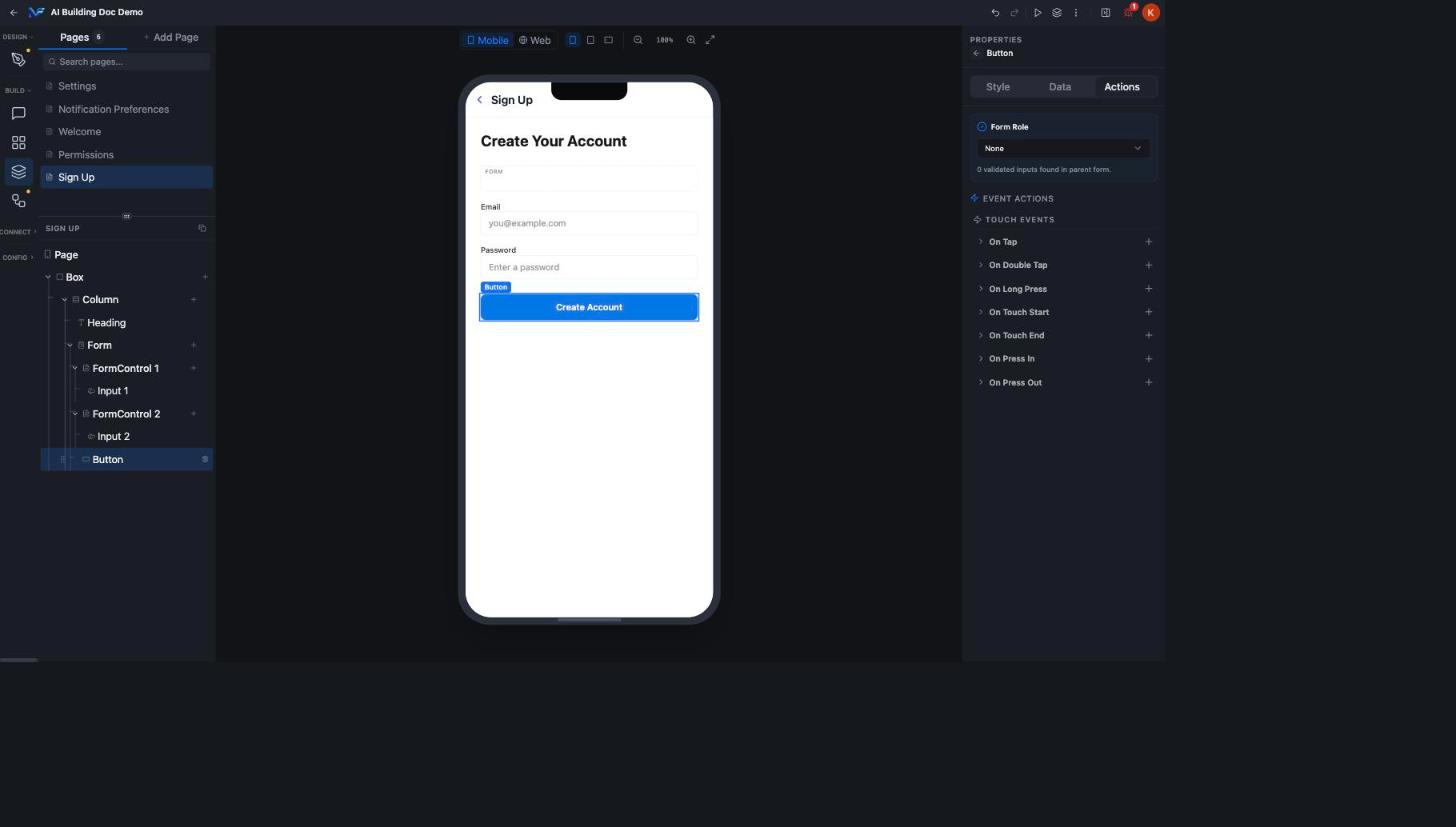 The gap on **Create Account** was not a surprise. The AI's own chat reply flagged that button as "not yet wired" and offered to connect it to an API call and a destination screen. Inspecting the real component data confirmed every part of that self report was accurate.
**A finished generation is not proof that everything was wired.** The step log for this same three screen build read "12 steps, 2 failed", with the failures in the `Setting component events` steps, even though the result delivered two working navigations and one clearly flagged gap.
Read the AI's own summary for anything it says it skipped, and open the Actions tab on the buttons where navigation matters. Do not treat the screen count alone as a pass.
A **Navigate To** wired by the AI is an ordinary action attached to the button's `On Tap` event. It is the same mechanism you get when you add an action by hand, so you can inspect and edit it exactly like any other.
## Iterate with follow up prompts
On the already built **Notification Preferences** page:
```text theme={null}
Change the Save Changes button to green, and add a fourth toggle row labeled
'Marketing Emails' below SMS Alerts with the same style as the others.
```
This modified the existing screen in place. It did not create a new page and it did not replace the screen. The **Save Changes** button's `Action` style changed from Primary blue to what the AI called the Positive or green action style, and a new `Marketing Emails` row appeared with the same structure as its neighbours: a label, a description and a `Switch`. The component tree showed it as a new sibling `Column` alongside the three that were already there.
The gap on **Create Account** was not a surprise. The AI's own chat reply flagged that button as "not yet wired" and offered to connect it to an API call and a destination screen. Inspecting the real component data confirmed every part of that self report was accurate.
**A finished generation is not proof that everything was wired.** The step log for this same three screen build read "12 steps, 2 failed", with the failures in the `Setting component events` steps, even though the result delivered two working navigations and one clearly flagged gap.
Read the AI's own summary for anything it says it skipped, and open the Actions tab on the buttons where navigation matters. Do not treat the screen count alone as a pass.
A **Navigate To** wired by the AI is an ordinary action attached to the button's `On Tap` event. It is the same mechanism you get when you add an action by hand, so you can inspect and edit it exactly like any other.
## Iterate with follow up prompts
On the already built **Notification Preferences** page:
```text theme={null}
Change the Save Changes button to green, and add a fourth toggle row labeled
'Marketing Emails' below SMS Alerts with the same style as the others.
```
This modified the existing screen in place. It did not create a new page and it did not replace the screen. The **Save Changes** button's `Action` style changed from Primary blue to what the AI called the Positive or green action style, and a new `Marketing Emails` row appeared with the same structure as its neighbours: a label, a description and a `Switch`. The component tree showed it as a new sibling `Column` alongside the three that were already there.
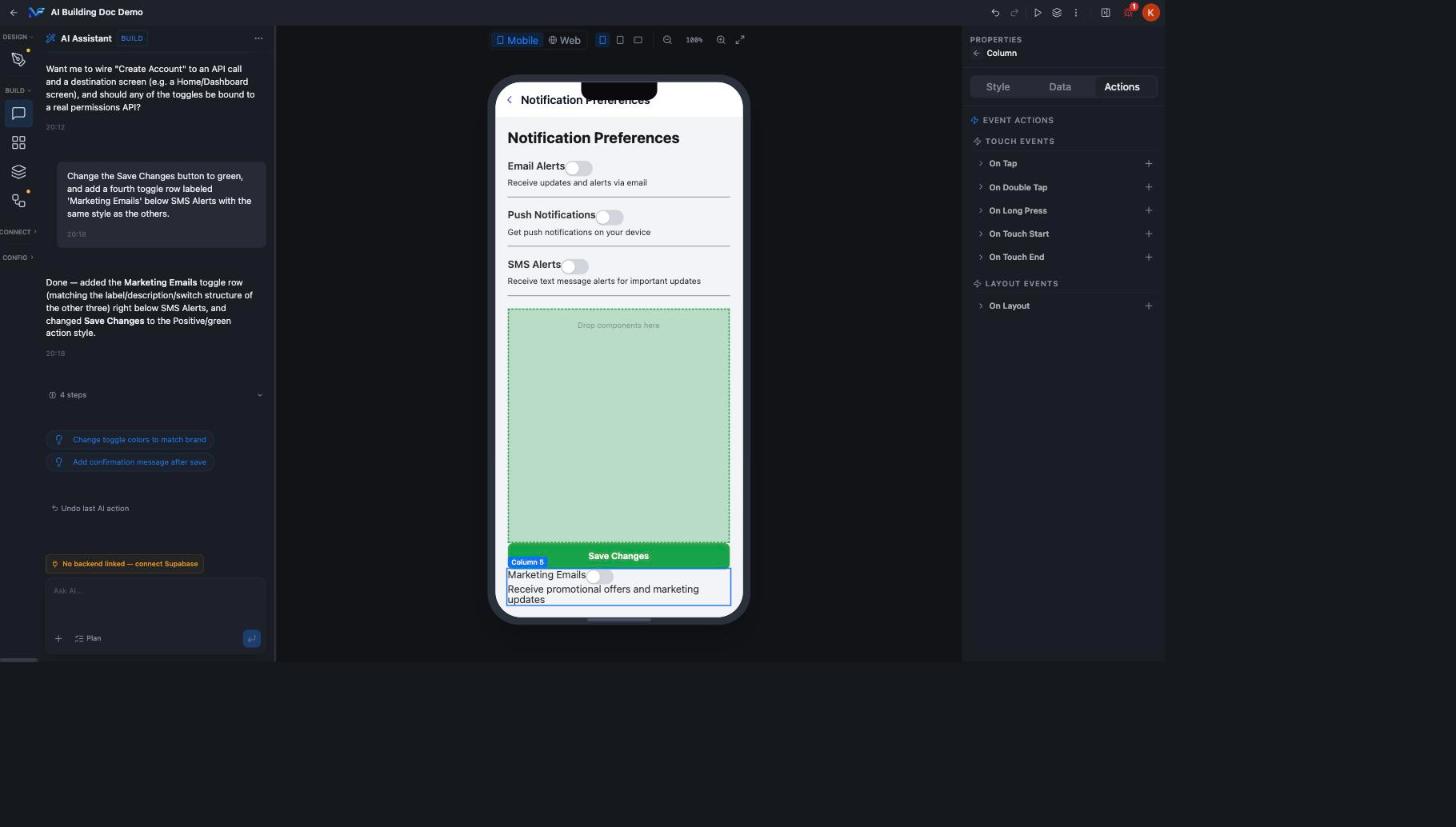 The new **Marketing Emails** row was appended as the last child of the page's top level Column, after the flexible spacer and the **Save Changes** button. It was not inserted directly below **SMS Alerts** as the prompt implied. Because the button is pinned to the bottom by that spacer, the new row rendered below the button instead of above it.
The AI got the content and the style of the new row right. It did not get the insertion position right relative to a component that was already pinned elsewhere in the layout. Give the canvas a visual check after any follow up that asks for something "below" or "above" a specific element.
Click **Undo last AI action** once after that follow up and you get a partial revert:
* The **Marketing Emails** row was removed completely. The component tree went back to ending at the **Save Changes** `Button`.
* The **Save Changes** button stayed green. It was not reverted to Primary.
* The chat transcript was not rolled back. The AI's message describing both changes, and its suggested follow up chips, stayed visible and now described a state the canvas no longer matched.
The new **Marketing Emails** row was appended as the last child of the page's top level Column, after the flexible spacer and the **Save Changes** button. It was not inserted directly below **SMS Alerts** as the prompt implied. Because the button is pinned to the bottom by that spacer, the new row rendered below the button instead of above it.
The AI got the content and the style of the new row right. It did not get the insertion position right relative to a component that was already pinned elsewhere in the layout. Give the canvas a visual check after any follow up that asks for something "below" or "above" a specific element.
Click **Undo last AI action** once after that follow up and you get a partial revert:
* The **Marketing Emails** row was removed completely. The component tree went back to ending at the **Save Changes** `Button`.
* The **Save Changes** button stayed green. It was not reverted to Primary.
* The chat transcript was not rolled back. The AI's message describing both changes, and its suggested follow up chips, stayed visible and now described a state the canvas no longer matched.
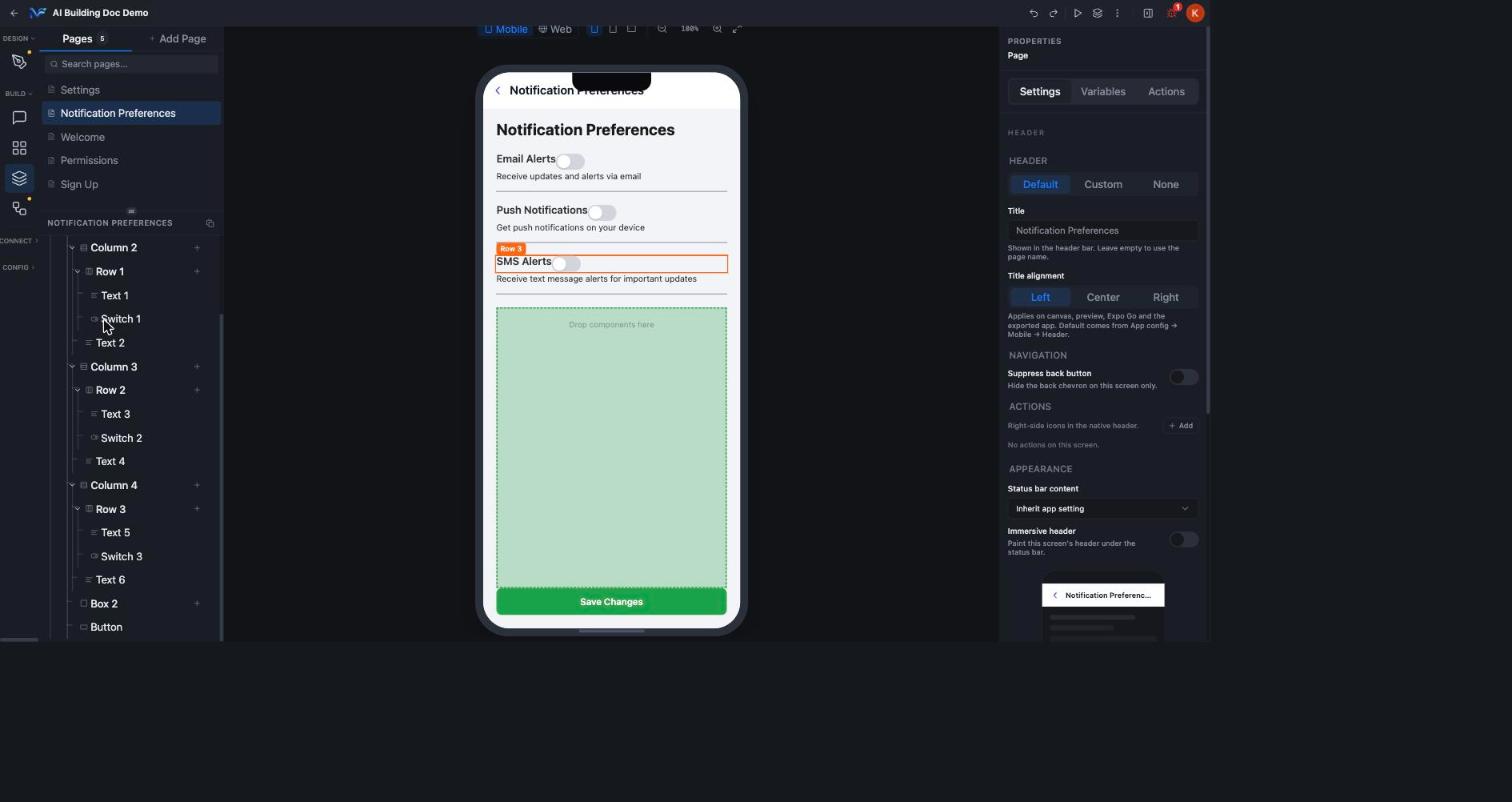 **Undo last AI action** undoes one edit step, not one chat turn. That follow up prompt ran as four discrete steps, and one click took back only the most recent one.
If a prompt made more than one change, one click of Undo may take back only part of it. Check the canvas and the component tree rather than the chat log, because the chat will keep narrating changes that are already gone.
## Next steps
Place and configure components by hand once the AI has laid out the screen.
Set up each generated page's header, variables and lifecycle actions.
Reparent nodes, add conditional styling and control visibility per platform.
The full catalog of actions you can attach to a button or a page event.
**Undo last AI action** undoes one edit step, not one chat turn. That follow up prompt ran as four discrete steps, and one click took back only the most recent one.
If a prompt made more than one change, one click of Undo may take back only part of it. Check the canvas and the component tree rather than the chat log, because the chat will keep narrating changes that are already gone.
## Next steps
Place and configure components by hand once the AI has laid out the screen.
Set up each generated page's header, variables and lifecycle actions.
Reparent nodes, add conditional styling and control visibility per platform.
The full catalog of actions you can attach to a button or a page event.